libprotobuf-mutator学习

简介

Protocol Buffers是一种序列化数据结构的协议。他是Google的开发的,而且与语言无关,与平台无关的可扩展机制,用于对结构化数据进行序列化(例如XML),但更小,更快,更简单。您定义要一次构造数据的方式,然后可以使用生成的特殊源代码轻松地使用各种语言在各种数据流中写入和读取结构化数据。

下面跟着一个台湾大佬实践了一下,并比较了下普通的libfuzzer

编译

官方得README写的很清楚,首先得装clang,这个直接用ubuntu的apt或者自己下载编译或者直接下载bin文件都可以

下面就粘贴一下官方的编译流程

1
2
3
sudo apt-get update
sudo apt-get install protobuf-compiler libprotobuf-dev binutils cmake \
ninja-build liblzma-dev libz-dev pkg-config autoconf libtool

之后编译和测试(cmake有修改,加上了-DLIB_PROTO_MUTATOR_DOWNLOAD_PROTOBUF=ON

1
2
3
4
mkdir build
cd build
cmake .. -GNinja -DCMAKE_C_COMPILER=clang -DCMAKE_CXX_COMPILER=clang++ -DCMAKE_BUILD_TYPE=Debug -DLIB_PROTO_MUTATOR_DOWNLOAD_PROTOBUF=ON
ninja check

这个编译有坑,事实并不是编译的时候出错,是最后测试包含在编译里,所以应该不影响使用,但这个问题也可以解决

实际在LibFuzzerExampleTest中两个测试失败,根据issues:https://github.com/google/libprotobuf-mutator/issues/108,是编译测试时没开启ASAN,导致测试的样本可能没有崩溃输出,导致测试失败,所以编译失败了

1
2
3
4
5
6
7
8
9
10
11
12
13
14
Expected equality of these values:
kDefaultLibFuzzerError
Which is: 77
GetError(RunFuzzer("libfuzzer_bin_example", 1000, 10000000))
Which is: 0
[ FAILED ] LibFuzzerExampleTest.Binary (471621 ms)
[----------] 2 tests from LibFuzzerExampleTest (1605469 ms total)

[----------] Global test environment tear-down
[==========] 2 tests from 1 test suite ran. (1605469 ms total)
[ PASSED ] 0 tests.
[ FAILED ] 2 tests, listed below:
[ FAILED ] LibFuzzerExampleTest.Text
[ FAILED ] LibFuzzerExampleTest.Binary

所以dende给出了解决方案,再ninja check即可

https://github.com/google/libprotobuf-mutator/compare/master...dende:master

最后就是安装(ninja其实已经ninja: no work to do.,check把该做的都做了)

1
2
ninja
sudo ninja install

Simple protobuf example

protoc程序需要使用libprotobuf-mutator/build/external.protobuf/bin/protoc编译,如果使用apt安装的进行编译,编译后得文件是不能使用的,会报错

1
~/libprotobuf-mutator/build/external.protobuf/protoc ./test.proto --cpp_out=./

会生成XXX.pb.cc和XXX.pb.h,XXX.pb.h是我们程序include的头文件,XXX.pb.cc是编译链接的时候使用

作者写了个Makefile,通过执行make,可以看到编译命令是

1
clang++-9 -o test_proto test_proto.cc test.pb.cc /home/pwn/libprotobuf-mutator/build/external.protobuf/lib/libprotobufd.a -I/home/pwn/libprotobuf-mutator/build/external.protobuf/include

那么运行

1
2
3
pwn@ubuntu:~/libprotobuf-mutator_fuzzing_learning/1_simple_protobuf/genfiles$ ./test_proto
101
testtest

通过这个实验,就是我们可以通过Protocol Buffers可以方便地定义数据结构,之后可以用set方法设置结构中的值,当然读取也很简单了

Combine libprotobuf-mutator with libfuzzer

先看harness.cc,就一个FuzzTEST函数

这个是先编译harness.ccharness.o

1
clang++-9 -g -fsanitize=fuzzer,address -c -DLLVMFuzzerTestOneInput=FuzzTEST harness.cc

之后在编译链接lpm_libfuzz.cc

1
clang++-9 -g -fsanitize=fuzzer,address -o lpm_libfuzz harness.o lpm_libfuzz.cc test.pb.cc /home/pwn/libprotobuf-mutator/build/src/libfuzzer/libprotobuf-mutator-libfuzzer.so /home/pwn/libprotobuf-mutator/build/src/libprotobuf-mutator.so /home/pwn/libprotobuf-mutator/build/external.protobuf/lib/libprotobufd.a -I/home/pwn/libprotobuf-mutator/build/external.protobuf/include -I/home/pwn/libprotobuf-mutator

运行需要那两个库

1
2
3
4
5
6
7
8
9
10
11
12
13
14
15
16
pwn@ubuntu:~/libprotobuf-mutator_fuzzing_learning/2_libprotobuf_libfuzzer$ ./lpm_libfuzz
./lpm_libfuzz: error while loading shared libraries: libprotobuf-mutator-libfuzzer.so.0: cannot open shared object file: No such file or directory
pwn@ubuntu:~/libprotobuf-mutator_fuzzing_learning/2_libprotobuf_libfuzzer$ ldd ./lpm_libfuzz
linux-vdso.so.1 (0x00007ffe4c751000)
libstdc++.so.6 => /usr/lib/x86_64-linux-gnu/libstdc++.so.6 (0x00007fba4e99f000)
libprotobuf-mutator-libfuzzer.so.0 => not found
libprotobuf-mutator.so.0 => not found
libm.so.6 => /lib/x86_64-linux-gnu/libm.so.6 (0x00007fba4e601000)
libpthread.so.0 => /lib/x86_64-linux-gnu/libpthread.so.0 (0x00007fba4e3e2000)
librt.so.1 => /lib/x86_64-linux-gnu/librt.so.1 (0x00007fba4e1da000)
libdl.so.2 => /lib/x86_64-linux-gnu/libdl.so.2 (0x00007fba4dfd6000)
libgcc_s.so.1 => /lib/x86_64-linux-gnu/libgcc_s.so.1 (0x00007fba4ddbe000)
libc.so.6 => /lib/x86_64-linux-gnu/libc.so.6 (0x00007fba4d9cd000)
/lib64/ld-linux-x86-64.so.2 (0x00007fba4ed28000)
pwn@ubuntu:~/libprotobuf-mutator_fuzzing_learning/2_libprotobuf_libfuzzer$ sudo ln -s /home/pwn/libprotobuf-mutator/build/src/libfuzzer/libprotobuf-mutator-libfuzzer.so.0 /lib/x86_64-linux-gnu/libprotobuf-mutator-libfuzzer.so.0
pwn@ubuntu:~/libprotobuf-mutator_fuzzing_learning/2_libprotobuf_libfuzzer$ sudo ln -s /home/pwn/libprotobuf-mutator/build/src/libprotobuf-mutator.so.0 /usr/lib/x86_64-linux-gnu/libprotobuf-mutator.so.0

再运行即可

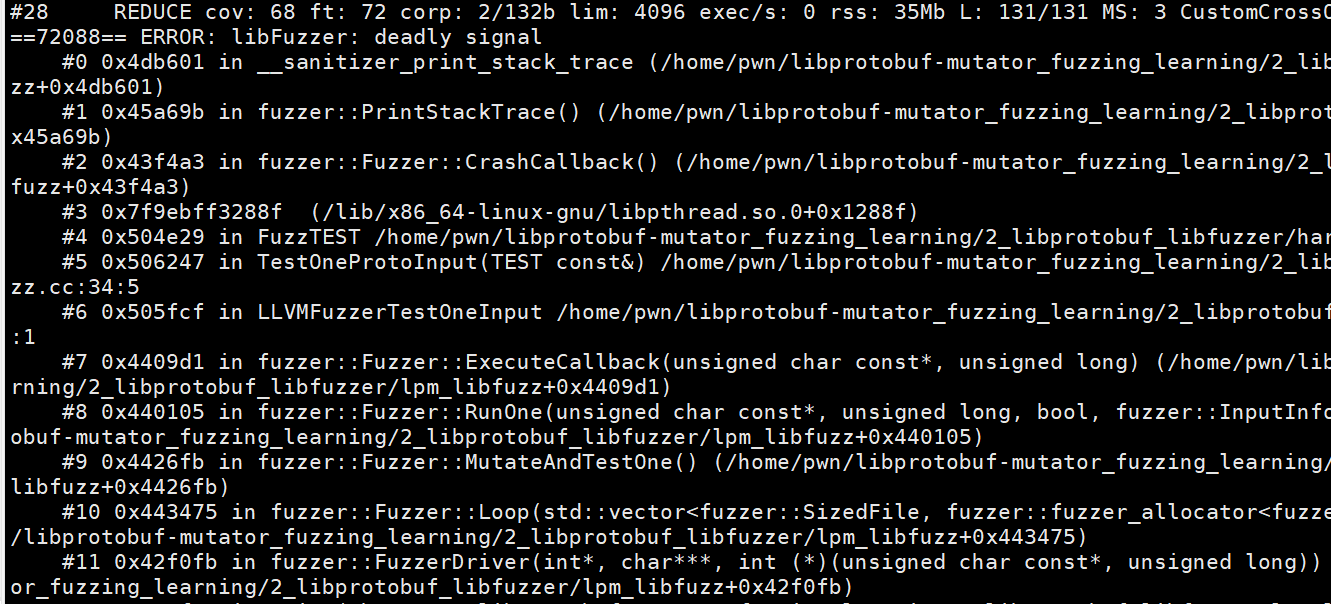
我通过ida看了下,发现比普通的libfuzzer相比,就是将libfuzzer的data转化为protobuf之后我们对protobuf处理后再传给要fuzz的函数

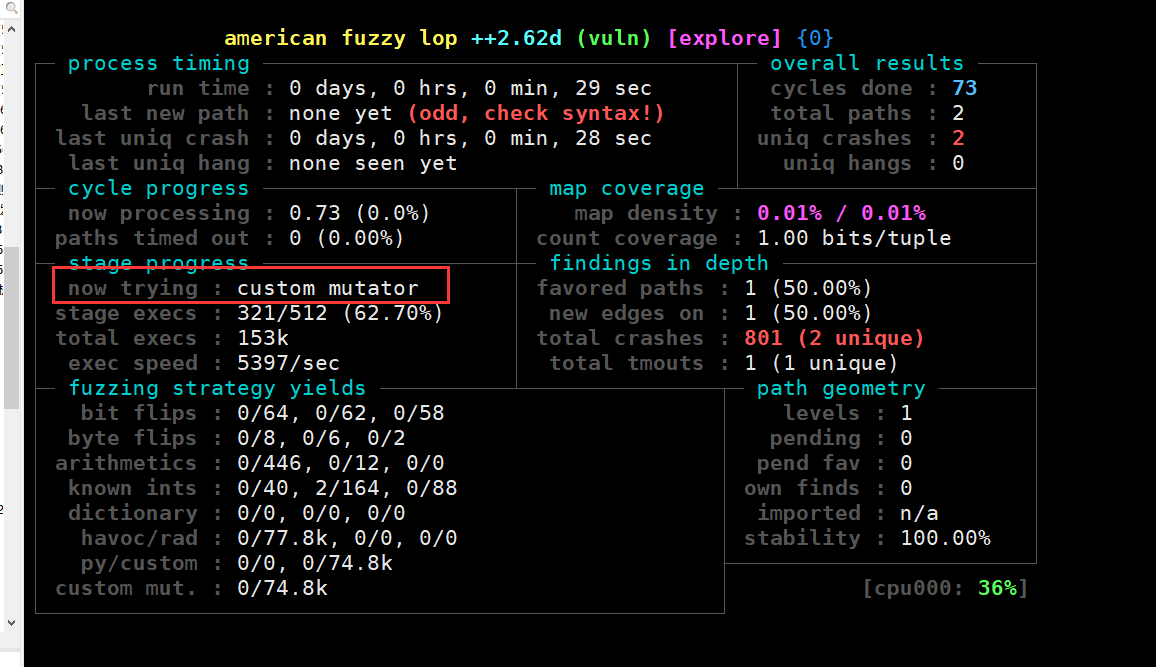
Combine libprotobuf-mutator with libfuzzer ( custom mutator )

这个例子是自定义变异

比如这个里面,限制了test.b只能是FUCK或者SHIT

1
2
3
4
5
6
7
8
9
10
11
12
13
14
15
16
17
18
19
20
21
22
23
DEFINE_PROTO_FUZZER(const TEST &test_proto) {
/* Register post processor with our custom mutator method */
if(!hasRegister) {
protobuf_mutator::libfuzzer::RegisterPostProcessor(
TEST::descriptor(),
[](google::protobuf::Message* message, unsigned int seed) {
TEST *t = static_cast<TEST *>(message);
/* test.b will only be "FUCK" or "SHIT" */
if (seed % 2) {
t->set_b("FUCK");
}
else {
t->set_b("SHIT");
}
}
);
hasRegister = true;
return;
}

auto s = ProtoToData(test_proto);
FuzzTEST((const uint8_t*)s.data(), s.size());
}

How to combine libprotobuf-mutator and AFL++

这是跟AFL++相结合,因为AFL++可以通过指定so文件去自定义变异的方法

跟着github下载编译afl++

https://github.com/vanhauser-thc/AFLplusplus

作者实现了afl++的自定义编译函数

1
2
3
4
5
6
7
8
9
10
11
12
13
14
15
16
17
18
19
20
21
22
23
extern "C" size_t afl_custom_fuzz(uint8_t *buf, size_t buf_size, uint8_t *add_buf,size_t add_buf_size, uint8_t *mutated_out, size_t max_size) {
// This function can be named either "afl_custom_fuzz" or "afl_custom_mutator"
// A simple test shows that "buf" will be the content of the current test case
// "add_buf" will be the next test case ( from AFL++'s input queue )

// Here we implement our own custom mutator
static MyMutator mutator;
TEST input;
// mutate input.a ( integer )
int id = rand() % 305;
input.set_a(id);
// mutate input.b ( string )
std::string tmp = "";
std::string new_string = mutator.MutateString(tmp, 1000); // use the default protobuf mutator
input.set_b(new_string);
// convert input from TEST to raw data, and copy to mutated_out
const TEST *p = &input;
std::string s = ProtoToData(*p); // convert TEST to raw data
size_t copy_size = s.size() <= max_size ? s.size() : max_size; // check if raw data's size is larger than max_size
memcpy(mutated_out, s.c_str(), copy_size); // copy the mutated data

return copy_size;
}

这个是通过宏定义进行加载的so文件——AFL_CUSTOM_MUTATOR_LIBRARY

1
2
3
4
5
6
7
pwn@ubuntu:~/libprotobuf-mutator_fuzzing_learning/4_libprotobuf_aflpp_custom_mutator$ cat run_fuzz.sh
#!/usr/bin/env sh

LD_LIBRARY_PATH=/usr/local/lib/ \ # for libprotobuf-mutator-libfuzzer.so.0 and libprotobuf-mutator.so.0
AFL_CUSTOM_MUTATOR_LIBRARY=$HOME/libprotobuf-mutator_fuzzing_learning/4_libprotobuf_aflpp_custom_mutator/lpm_aflpp_custom_mutator.so \
AFL_SKIP_CPUFREQ=1 \
afl-fuzz -i ./in -o ./out ./vuln

可以看到运行使用的变异策略是我们自定义的策略

普通libfuzzer与加了libprotobuf-mutator之后的对比

整体还是相同的,顺便看看libfuzzer的大概的原理

首先将LLVMFuzzerTestOneInput函数传到fuzzer::FuzzerDriver函数里

1
2
3
4
5
6
7
8
9
10
11
int __cdecl main(int argc, const char **argv, const char **envp)
{
int result; // eax
char **v4; // [rsp+0h] [rbp-10h]
int v5; // [rsp+Ch] [rbp-4h]

v5 = argc;
v4 = (char **)argv;
fuzzer::FuzzerDriver(&v5, &v4, (int (__cdecl *)(const char *, ulong))LLVMFuzzerTestOneInput);
return result;
}

fuzzer::FuzzerDriver函数里面,就是利用LLVMFuzzerTestOneInput函数初始化Fuzzer,之后尝试读取corpus(语料库)或者Dictionary(字典),最后进行循环地测试

1
2
3
4
5
6
7
8
9
10
11
12
13
14
15
16
17
18
19
20
21
22
23
24
   v121 = LLVMFuzzerTestOneInput_addr;
fuzzer::Fuzzer::Fuzzer(v120, (__int64)LLVMFuzzerTestOneInput_addr, v119, v118, (__int64)a5);
fuzzer::FuzzingOptions::~FuzzingOptions();
v122 = *(_QWORD *)v248;
for ( j = *(_QWORD *)&v248[8]; j != v122; v122 += 24LL )
{
v121 = *(std::Fuzzer::thread ***)v122;
v124 = *(_QWORD *)(v122 + 8) - *(_QWORD *)v122;
if ( v124 <= 0x40 )
{
LOBYTE(v253[0]) = 0;
v125 = v124;
_interceptor_memcpy();
LOBYTE(v253[0]) = v125;
v121 = v253;
fuzzer::MutationDispatcher::AddWordToManualDictionary();
}
}
......
//中间有读取样本目录的文件,假如有字典就分析字典等操作
......
//接下来就是循环测试
fuzzer::Fuzzer::Loop((fuzzer::Fuzzer *)v136, (__int64)endptr);
......

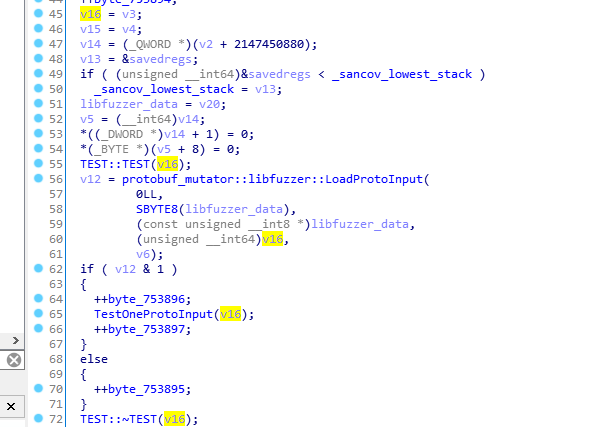
接下来看看添加了libprotobuf-mutator之后的情况,不同的就是LLVMFuzzerTestOneInput函数,普通的libfuzzer我们的代码就是自己实现LLVMFuzzerTestOneInput函数,所以LLVMFuzzerTestOneInput就是我们的代码

而libprotobuf-mutator是用libfuzzer传入的data参数转化为protobuf——下面的v16

之后将v16传到TestOneProtoInput函数

1
2
3
4
5
6
7
8
9
10
11
12
13
14
15
16
17
18
19
20
21
22
libfuzzer_data = v20;
v5 = (__int64)v14;
*((_DWORD *)v14 + 1) = 0;
*(_BYTE *)(v5 + 8) = 0;
TEST::TEST(v16);
v12 = protobuf_mutator::libfuzzer::LoadProtoInput(
0LL,
SBYTE8(libfuzzer_data),
(const unsigned __int8 *)libfuzzer_data,
(unsigned __int64)v16,
v6);
if ( v12 & 1 )
{
++byte_753896;
TestOneProtoInput(v16);
++byte_753897;
}
else
{
++byte_753895;
}
TEST::~TEST(v16);

TestOneProtoInput函数就是DEFINE_PROTO_FUZZER函数的代码

这个从源码也可以看出来https://github.com/google/libprotobuf-mutator/blob/fe76ed648dab1923d9b624b63dc3484fcc10dc76/src/libfuzzer/libfuzzer_macro.h#L28

1
2
3
4
5
6
7
8
9
10
11
12
13
14
15
16
17
18
19
20
21
22
23
24
25
// Defines custom mutator, crossover and test functions using default
// serialization format. Default is text.
#define DEFINE_PROTO_FUZZER(arg) DEFINE_TEXT_PROTO_FUZZER(arg)
// Defines custom mutator, crossover and test functions using text
// serialization. This format is more convenient to read.
#define DEFINE_TEXT_PROTO_FUZZER(arg) DEFINE_PROTO_FUZZER_IMPL(false, arg)

#define DEFINE_TEST_ONE_PROTO_INPUT_IMPL(use_binary, Proto) \
extern "C" int LLVMFuzzerTestOneInput(const uint8_t* data, size_t size) { \
using protobuf_mutator::libfuzzer::LoadProtoInput; \
Proto input; \
if (LoadProtoInput(use_binary, data, size, &input)) \
TestOneProtoInput(input); \
return 0; \
}

#define DEFINE_PROTO_FUZZER_IMPL(use_binary, arg) \
static void TestOneProtoInput(arg); \
using FuzzerProtoType = std::remove_const<std::remove_reference< \
std::function<decltype(TestOneProtoInput)>::argument_type>::type>::type; \
DEFINE_CUSTOM_PROTO_MUTATOR_IMPL(use_binary, FuzzerProtoType) \
DEFINE_CUSTOM_PROTO_CROSSOVER_IMPL(use_binary, FuzzerProtoType) \
DEFINE_TEST_ONE_PROTO_INPUT_IMPL(use_binary, FuzzerProtoType) \
DEFINE_POST_PROCESS_PROTO_MUTATION_IMPL(FuzzerProtoType) \
static void TestOneProtoInput(arg)

那么实际DEFINE_PROTO_FUZZER就是我们实现TestOneProtoInput函数

而这个TestOneProtoInput函数是由LLVMFuzzerTestOneInput调用的,看到这,整个流程的通了

1
2
3
4
5
6
7
8
#define DEFINE_TEST_ONE_PROTO_INPUT_IMPL(use_binary, Proto)                 \
extern "C" int LLVMFuzzerTestOneInput(const uint8_t* data, size_t size) { \
using protobuf_mutator::libfuzzer::LoadProtoInput; \
Proto input; \
if (LoadProtoInput(use_binary, data, size, &input)) \
TestOneProtoInput(input); \
return 0; \
}

其实就是写好了LLVMFuzzerTestOneInput,让你自己写TestOneProtoInput

参考

https://github.com/google/libprotobuf-mutator
https://github.com/bruce30262/libprotobuf-mutator_fuzzing_learning

打赏专区